Introduction
Most woodworkers struggle with curved cuts long before they struggle with joinery. A graceful arc looks simple until the saw wanders, the blade binds, or the curve comes out jagged on one side. Getting it right comes down to preparation and tool control — not just which saw you own.
The right approach depends on the curve type (tight vs. gradual, interior vs. edge cut), your wood thickness, and the tool available. A band saw handles sweeping curves in thick oak with ease. A coping saw or spiral wire saw navigates tight spirals in 1/2" pine where a wider blade simply can't follow.
Setup and execution drive results as much as the tool itself — blade width, feed speed, and workpiece stability all shift the outcome.
This guide covers tool selection, preparation, step-by-step cutting technique, key variables, and common mistakes, so you finish with a clear plan for your specific project.
Key Takeaways
- Tool choice depends on curve tightness, wood thickness, and whether you're cutting from an edge or an interior point
- Mark your curve clearly before cutting; a precise layout line is the foundation of a clean result
- Blade width and TPI determine both how tight a curve you can cut and how smooth the edge comes out
- Feed slowly and let the blade do the work rather than forcing the tool through the wood
- Rasps, files, or sanders are almost always needed to reach your final line and smooth the cut edge
Choosing the Right Tool for Cutting Curves in Wood
No single saw handles all curve scenarios equally. Tool selection should be driven by curve radius, cut location (edge versus interior), and stock thickness, not just what sits in your shop.
Band Saw
The band saw is the go-to tool for cutting curves in thick stock over 1 inch. The blade stays vertical throughout the cut and can be guided along a marked line with good control. Benchtop models typically offer 4-5/8" to 5.75" of cutting height, while floor-standing 14" models handle 13" to 14" of stock.
The tradeoff: band saws cannot make interior cuts without a lead-in from the edge, since the blade operates as a continuous loop.
Jigsaw
A jigsaw is the most versatile handheld option, capable of making both edge and interior curved cuts by using a starter hole. It handles stock up to several inches thick.
The downside is blade flex. Longer blades for thicker stock are prone to bending sideways, which produces an angled rather than perpendicular cut edge. Using thicker "straight cut" blades and feeding slowly reduces this deflection.
Coping Saw, Fret Saw, and Turning Saw
These frame-based hand saws are traditional curve-cutting tools:
- Turning saw: 12" blade, narrow, fine-pitched. Ideal for curves in stock up to about 1 inch thick. A 10 TPI turning saw blade can cut curves in oak up to 3 inches thick.
- Coping saw and fret saw: Handle tighter curves in thinner stock but have fragile blades that break if overheated or forced.
They provide precise, tactile control that power tools cannot replicate.
Router With Trammel or Template
A router with a trammel jig cuts perfect circles and arcs with a clean, finished edge. The trammel acts as a compass: a pivot pin is secured to the center, and the router swings in a circle at the desired radius.
A router with a flush-trim pattern bit is ideal for duplicating curves across multiple identical parts. This method works best as a final step after rough material is removed with a jigsaw or band saw.
Circular Saw (Gradual Curves Only)
A circular saw can cut gradual, sweeping curves by keeping steady feed pressure and setting blade depth just below stock thickness. This method is only suitable for rough curves with a large radius.
Attempting tight curves causes the blade to bind and overheat, creating a severe kickback risk as you twist the blade in the kerf.
Wire Saw Blades for Confined and Multi-Directional Cuts
Where conventional flat blades can't reach—interior cutouts, curved notches, tight spaces—the circular saw's limitations make a strong case for a different approach entirely. A multi-directional wire saw blade handles what flat blades cannot.
The Spyral blade by Bestway Products Company is a round wire saw blade that cuts in 360 degrees. Unlike flat blades with teeth on one side, the Spyral features a single continuous spiral tooth that wraps around the entire wire. This lets you maneuver in any direction without repositioning the workpiece.
Key capabilities and specs:
- Cuts tight curves, V-cuts, and spiral cuts where flat blades would jam
- Available in .028", .040", and .050" diameters
- Threads through small starter holes for interior cuts
- Blade ends twist off for use as a hole saw, then reattach—unique to the round wire design
What You Need Before Cutting Curves in Wood
Preparation directly determines accuracy and safety. Starting a curved cut with the wrong blade, an unmarked line, or an unsecured workpiece is the most common reason for wasted material.
Layout and Marking Tools
Draw curves accurately before cutting using:
- Compass or trammel: For arcs and circles
- Flexible batten or plastic molding strip: Bent and held at both ends for smooth freeform curves
- French curves: For smaller decorative curves
- Pencil or marking knife: For the cut line itself
The time spent on layout is always less than the time spent correcting a cut that drifted off-line.
When no compass is available, the two-stick arch method is a reliable field technique for drawing accurate arches. Lay two sticks against nails driven at the arch endpoints and connect them at the center peak. Place a marker in the crotch of the sticks and slide the assembly from nail to nail to draw a perfect arc.
Workpiece Setup and Safety Checks
The workpiece must be firmly clamped or supported before any cut begins. For handheld tools like a jigsaw or coping saw, a workbench with clamps prevents the wood from shifting mid-cut.
Before cutting, run through these setup steps:
- Clamp the workpiece securely — two clamps at opposite corners prevents shifting mid-cut
- Drill a pilot hole in the waste area for interior cuts; a 3/8-inch bit provides adequate blade clearance
- Thread the blade through the pilot hole before reconnecting it to the saw
- Wear eye protection and control dust from the first cut to the last
How to Cut Curves in Wood: Step by Step
Regardless of the tool or curve type, every curved cut follows the same four-stage sequence: mark, set up, cut, and refine.
Step 1: Mark the Curve on the Wood
Choose the right layout tool based on curve type:
- Compass or trammel points: For consistent arcs and circles
- Flexible batten: Thin strip of wood or plastic molding bent and traced for smooth irregular curves
- French curves: For smaller decorative shapes
Always draw the line on the waste side of the intended finished surface to preserve the correct dimension.
Step 2: Set Up the Workpiece and Select the Blade
Blade selection depends on the curve:
- Narrower blades (1/8" to 1/4"): Turn tighter radii. A 1/4" blade cuts a 5/8" radius minimum.
- Wider blades: Cut straighter and faster
- Higher TPI: Produces a smoother cut edge but slower feed
- Lower TPI: Removes material quickly but leaves a rougher edge
The workpiece should be secured at a height that gives the tool room to maneuver through the curve without the frame or body contacting the wood prematurely. This is especially relevant for coping saws and jigsaws on tighter curves.
Step 3: Make the Cut
Begin cutting just outside the layout line on the waste side. Feed the tool at a pace that keeps the blade cutting smoothly without binding. Forcing speed increases heat, vibration, and deviation from the line.
Depending on your tool and curve type, apply the appropriate technique:
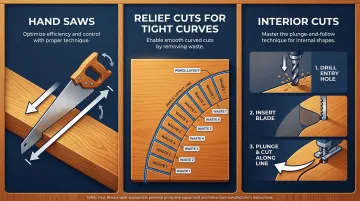
- Hand saws (turning saws, coping saws): Cut only on the forward stroke and use the full blade length for each pass. Rotate the blade to follow the curve — don't torque the frame.
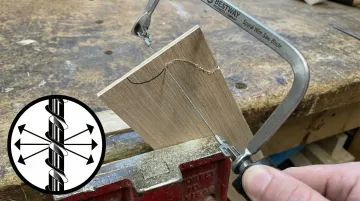
- Tight curves on a band saw or circular saw: Use the relief cut technique — make several straight cuts from the edge into the waste area, spaced about an inch apart, stopping just short of the curve line. This releases waste in sections and prevents blade binding as you navigate the curve.
- Interior cuts: Drill a starter hole in the waste area, insert the blade, then cut toward and along the layout line.
Step 4: Refine and Smooth the Curve
Saw cuts are almost never the final surface — every curve needs refining back to the layout line. The right method depends on quantity and precision required:
- Single parts: Work back to the line with rasps, files, a spokeshave, or a spindle sander.
- Multiple matching parts: Stack identical curved pieces and sand them together. The wider combined surface is more stable and ensures all edges match precisely.
- High-accuracy multiples: Use a router with a flush-trim bit and an MDF template. Rough-cut each workpiece to within 1/16" to 1/8" of the final shape, then rout to the template line for consistent results across every piece.
Key Variables That Affect the Quality of a Curved Cut
Two woodworkers using the same saw can get very different results. Blade selection, feed speed, stock thickness, and grain direction all influence whether a curved cut comes out clean or requires heavy correction work.
Blade Width and TPI
Blade width determines the minimum curve radius a blade can follow without binding — narrower blades handle tighter curves. TPI controls edge smoothness and feed speed.
Using a blade too wide for your curve forces it off-line or causes binding. Too few TPI leaves a rough edge that needs heavy sanding. Too many TPI causes heat buildup in thicker stock because sawdust can't clear the gullets fast enough.
Curve Radius Relative to Stock Thickness
The tighter the curve and the thicker the stock, the more blade flex becomes a problem. A longer blade through thick material tends to drift off vertical — especially on tight radii.
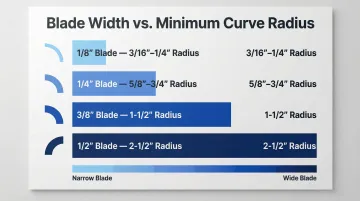
Common blade widths and their minimum curve radii:
- 1/8" blade = 3/16" to 1/4" radius
- 1/4" blade = 5/8" to 3/4" radius
- 3/8" blade = 1-1/2" radius
- 1/2" blade = 2-1/2" radius
Feed Speed and Cutting Pressure
Advancing too quickly prevents teeth from clearing sawdust, leading to heat, vibration, and blade drift. Moving too slowly can cause burning in dense hardwoods.
For hand saws, use slow and steady strokes. For power tools, apply consistent feed pressure without forcing. Both keep the blade tracking accurately and extend its life.
Wood Species and Grain Direction
Hardwoods require a slower, more controlled feed rate and often benefit from a blade with fewer, more aggressive teeth. Cutting across the grain on curves causes tearout on the exit side of the cut.
Where possible, orient cuts to follow the grain through curved sections. On thin or fragile stock, backing the workpiece with a scrap piece limits tearout significantly.
Common Mistakes When Cutting Curves in Wood
- Skipping the layout: Cutting freehand without a clear line leads to inconsistent curves that require excessive sanding and result in unusable parts. Always mark first and cut second.
- Wrong blade width for tight curves forces you to torque the saw — stressing the blade, wandering from the line, and risking breakage. Match blade width to your minimum curve radius before you start.
- Forcing the feed speed: Pushing faster than the blade can clear sawdust causes heat buildup, lateral deflection, and a wavy cut line. Cut speed — not blade quality — is the most common culprit behind a wandering curve.
- Not securing the workpiece: Any movement during the cut shifts the blade away from your layout line. Clamp firmly before starting and confirm that clamps don't obstruct the cut path.
Frequently Asked Questions
How do you cut accurate curves, arcs, or contours in wood?
Accuracy starts with a well-marked layout line using a compass, trammel, or flexible batten. Cut just outside the line on the waste side, then refine back to the line with rasps, files, or a router and flush-trim template.
What saw is best for cutting curves in wood?
For most woodworkers, the band saw (for thick stock and edge cuts) and the jigsaw (for versatility and interior cuts) are the most practical options. Hand frame saws like the turning saw and coping saw offer more control for thin stock and tight curves.
What saw is best for cutting curves in thick wood or plywood?
A band saw works best for thick solid stock — the blade stays vertical and tracks accurately through the cut. For interior cuts in thick plywood, use a jigsaw with a long, stiff blade at least 1 inch longer than the material thickness.
How do you bend or curve wood, for example, 3/4 inch plywood?
Bending and cutting are different processes. Cutting removes material along a curved path; bending shapes wood using steam or thin laminated layers over a form. For 3/4" plywood, cutting curves uses a band saw or jigsaw, while true bending requires kerfing or thinner stock.
What is a curved saw called?
Several saws are designed specifically for curves: a band saw for thick stock, a scroll saw for fine detail work, a coping saw or fret saw for tight curves in thin stock, and a turning saw or bow saw for traditional hand cutting. Wire saws like the Spyral blade cut curves in any direction without repositioning the workpiece.