Introduction
You've just finished a cut, and now you're facing a long, springy bandsaw blade that needs to come off the saw. Most guides walk you through blade selection, tensioning, and cutting techniques — but then skip over the coiling process entirely. That omission matters more than you'd think.
According to OSHA accident search data for "bandsaw" incidents, off-machine handling injuries are well documented — including lacerations from operators reaching near improperly stored blades. The risks are consistent and preventable with the right technique.
An improperly coiled or uncoiled blade can injure the operator, damage the teeth, or cause the loops to spring apart without warning. This guide covers the complete process: how to safely coil a blade into three loops, how to uncoil it without losing control, and how to store it between uses.
Key Takeaways
- Full PPE (cut-resistant gloves and safety goggles) is mandatory every time you handle a bandsaw blade
- Use the three-loop coiling technique — push down, twist your wrist, and let the blade's tension guide each fold
- Never throw a coiled blade to uncoil it — use controlled arm extension away from your body
- Secure the coil with a binder clip or twist tie immediately to prevent spring-back
- Inspect every blade you uncoil for cracks, kinks, or missing teeth before reinstalling
What You Need Before Coiling or Uncoiling a Bandsaw Blade
Bandsaw blades store tension — skip the right gear or work in a cramped space and they can spring back hard. Get these two things right before you start.
Safety Gear and Workspace Requirements
Required PPE (non-negotiable):
- Cut-resistant gloves — ANSI/ISEA 105-2024 A4–A6 rated (1,500–3,999g cut resistance); standard for metal fabrication work
- Safety goggles or glasses — ANSI/ISEA Z87.1-2025 compliant eye protection protects against flying particles during uncoiling
- Close-toed shoes — ASTM F2413-24 rated safety footwear protects against dropped blades
- Long sleeves — reduces risk of incidental contact with blade teeth
Workspace setup:
- Floor clearance of at least 4–6 feet to handle the blade's full diameter
- A soft mat or cardboard sheet to place the blade on, protecting teeth from concrete surfaces
- No bystanders within arm's reach during coiling or uncoiling
Blade Type Considerations
Blade width determines how much resistance you'll feel and whether you need a second pair of hands. Narrow blades form loops easily; wide blades fight back.
Blade width categories:
- Narrow (1/8" to 1/2") — tight curve work; coils easily with one-handed technique
- Medium (5/8" to 3/4") — general-purpose resawing; requires deliberate downward pressure
- Wide (1" and above) — straight cuts and resawing; often needs two operators
Traditional flat bandsaw blades require the three-loop coiling technique described in this guide. Round wire saw blades — like those manufactured by Spyral Saw — store and handle differently and do not require this process.
How to Coil a Bandsaw Blade: Step-by-Step
Coiling a bandsaw blade correctly comes down to wrist rotation working with the blade's natural tension — not against it. Forcing the blade or rushing the process increases the risk of it snapping back.
Before you begin, confirm you have the following on hand:
- Heavy-duty cut-resistant gloves and safety glasses
- A soft mat or flattened cardboard for the floor
- Binder clips, masking tape, or strong twist ties for securing the finished coil
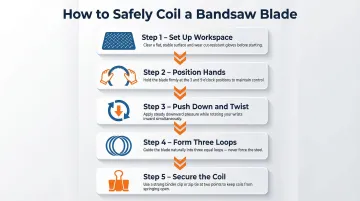
Step 1: Set Up Your Workspace and Position the Blade
Put on all PPE before handling the blade. Remove the blade from the bandsaw following the machine's safety procedure and lay it flat on a soft mat or cardboard on the floor.
Stand with feet shoulder-width apart. Hold the top of the blade loop at roughly chest height with your dominant hand, palm facing inward, while the bottom of the loop rests on the mat beneath your foot to anchor it.
Step 2: Position Your Hands Correctly
Grip the top of the blade with both hands about shoulder-width apart, fingers wrapped over the top and thumbs pointing inward. Teeth should face away from your body to reduce contact risk.
Confirm your foot is applying light downward pressure on the bottom of the loop to stabilize the blade before proceeding.
Step 3: Push Down and Begin the Twist
In one controlled motion, push the top of the blade downward while simultaneously rotating your dominant wrist downward (as if turning a steering wheel away from you). The blade will begin to buckle and fold.
The blade should form an oval or figure-8 shape at this stage. If it resists sharply, check that your foot anchor is firm and that you are not gripping the blade too far apart.
Step 4: Form the Three Loops
Continue pushing down and rotating until three overlapping circular loops form. The blade will naturally guide itself into this shape once you establish the initial fold — avoid fighting the blade's direction.
Use your free hand to gather the three loops together as they form. Keep a firm grip — releasing the loops prematurely will cause the blade to spring open and force you to start over.
Step 5: Secure the Coil
Once all three loops are aligned and gathered in one hand, immediately apply a binder clip, masking tape, or strong twist tie at one or two points around the circumference to lock the coil in place.
Do a quick visual check that the loops are evenly stacked and the fastener is holding before setting the blade down. If the fastener shifts or the loops separate, re-secure before moving the blade — an unsecured coil can spring open under handling pressure.
How to Uncoil a Bandsaw Blade: Step-by-Step
Uncoiling is often described as the "reverse" of coiling, but it carries its own specific risks. The blade springs outward with significant force when the loops release, which can cause cuts or eye injuries if not controlled.
Step 1: Confirm PPE and Inspect the Coil
Put on heavy gloves and safety goggles before touching the coiled blade. If the blade is new, remove any manufacturer's blade guard or packaging tape first.
Inspect the coil for any signs of rust, kinking, or damage before uncoiling. If the blade looks compromised, do not install it.
Step 2: Grip the Coil Correctly
Hold the coil with both hands, one on each outer loop, with the teeth pointing toward your gloved palms rather than exposed skin. Identify the free-hanging middle loop, which is the one that releases first.
Keep your hands at waist height or below. If the blade springs upward, it moves away from your face.
Step 3: Remove the Fastener and Release
Remove the binder clip, tape, or wire securing the coil while maintaining a firm grip on both outer loops.
Slowly allow the loops to spread apart under their own tension. Do not throw or drop the coil — guide the loops open gradually.
Step 4: Extend Arms and Inspect
Extend your arms away from your body as the loops continue to open, allowing the blade to spring into one large loop naturally. Keep your face turned slightly to the side until the blade is fully extended.
Once uncoiled, inspect the blade before installing:
- Missing or broken teeth
- Visible cracks along the blade body
- Kinks or bends that won't straighten
- Discoloration indicating heat damage or excessive wear
Unsafe signs requiring replacement:
- Any crack, regardless of size
- Multiple missing teeth
- Kinks that remain after straightening
- Any blade that has been welded more than once
How to Store and Transport a Coiled Bandsaw Blade
Proper storage protects both the blade and anyone who handles it later. A blade stored without a fastener or in a damp environment can become dangerous or degrade quickly.
Storage Options and Best Practices
Most common storage methods:
- Wall hooks: Hang coiled blades on a labeled hook in a dry workshop; Laguna Tools recommends positioning teeth against a wall with cardboard or wood protection to prevent accidental contact and tooth damage
- Blade holders: Use a dedicated organizer similar to a file holder with vertical slots
- Vertical racks: Store in labeled slots with blades standing upright
Do NOT stack horizontally. Do NOT stack horizontally. Stacking deforms the coil and stresses the blade over time.
Critical rule: All stored blades, whether kept for future use or awaiting disposal, must remain coiled and fastened. A loose used blade in a trash bin is a serious injury risk for anyone handling the waste.
Transporting Blades Safely
When transporting blades, place the secured coil in a hard-sided carrying case or wrap it in heavy cardboard and tape. Label the package clearly with a warning about sharp blade contents.
For long-term storage, lightly coat the blade with a rust-preventive lubricant or wax before coiling. Keep it in a dry environment away from humidity, and store in a sealed bag or case when possible.
Common Mistakes and Troubleshooting When Coiling or Uncoiling
Blade handling causes more injuries and equipment damage than the cutting process itself. Three mistakes account for most incidents:
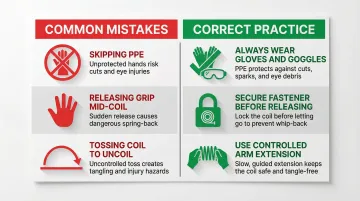
- Skipping PPE: Even a slow, controlled movement can catch skin on the teeth. Always wear thick gloves and eye protection before touching the blade — no exceptions, no "just a quick" moments.
- Releasing grip mid-coil: Letting go before the fastener is secured causes the blade to spring open with enough force to whip across the room. If your grip slips, set the blade down on a mat and restart — don't try to recover one-handed.
- Tossing the coil to uncoil it: Throwing the coil in the air or onto the floor to let it spring open is an uncontrolled hazard that can also damage the teeth. Use the controlled arm-extension method instead.
Troubleshooting: Blade won't form loops
If the blade resists forming three loops, the cause is usually insufficient downward force, a blade too wide for a solo operator, or residual tension from heavy use. Reposition your foot anchor lower on the blade and apply firm downward pressure. For wider blades, ask a second person to assist.
Frequently Asked Questions
How many loops should a coiled bandsaw blade have?
Most standard bandsaw blades coil into three loops, which balances compactness with manageable coil diameter. Very short or narrow blades may form only two loops, while longer industrial blades may require additional securing points.
Can you coil a bandsaw blade without gloves?
No — even a worn or dull blade can cause serious lacerations during the coiling process. Thick leather or cut-resistant gloves rated ANSI A4 or higher are required at every skill level.
Does blade width affect how you coil a bandsaw blade?
Yes, wider blades (3/4" and above) are stiffer and require more controlled downward force to form loops. They may need a second operator to hold the loops while the first applies the fastener.
What should I do if a bandsaw blade is kinked or damaged after uncoiling?
A kinked or cracked blade should not be reinstalled. A professional welder can sometimes correct minor kinks, but a blade with cracks or broken teeth should be safely disposed of, kept coiled and fastened for handling safety.
How do I know when it's time to replace a bandsaw blade rather than recoil and reuse it?
Replace when you notice dull cutting, visible cracks or missing teeth, blade drift, or a blade that has already been welded more than once. As a general benchmark, standard steel blades last 300–800 board feet and carbide-tipped blades 750–1,500 board feet between sharpenings.
Can you coil and store a bandsaw blade long-term without it rusting?
Before long-term storage, coat the blade lightly with rust-preventive lubricant or wax, then keep it coiled in a sealed bag in a dry location. For maximum protection, VCI (vapor corrosion inhibitor) vacuum bags are purpose-built for long-term metal storage.