Introduction
The coping saw appears in virtually every serious woodworker's shop—its distinctive U-shaped frame and thin blade instantly recognizable on tool racks from professional trim carpentry shops to basement hobby workshops. Yet most woodworkers reach for a jigsaw out of habit—even when a coping saw would produce a cleaner cut in less time, at a fraction of the cost.
The real question is when the coping saw is the right tool—not just a nostalgic one. This guide covers its core applications, from the namesake coping joint in trim carpentry to curved cuts in furniture and decorative work. It also explains how blade choice, frame geometry, and technique separate clean professional results from frustrating tearout.
Key Takeaways
- A coping saw is a U-shaped hand saw with a thin, tensioned, removable blade designed primarily for cutting coped joints in molding and baseboards
- The blade rotates relative to the frame, allowing direction changes mid-cut for curved profiles, interior piercing cuts, and decorative scroll-style work
- Blade selection (TPI and material type) determines what you can cut: wood molding, plastic pipe, or thin metals
- Throat depth (4–6 inches) limits how far from an edge you can cut, but no hand tool rivals it for portable, affordable curved cuts
- It won't replace a bandsaw for thick stock or a fretsaw for ultra-fine detail, but excels where power tools are impractical
What Is a Coping Saw?
A coping saw is a type of bow saw featuring a C- or U-shaped metal frame, a thin removable steel blade held under tension between two swiveling blade pins, and a handle that twists to rotate the blade angle relative to the frame. The blade length typically runs 6 to 6.5 inches, with throat depths (the gap between blade and frame spine) ranging from 4 to 6.75 inches depending on the manufacturer.
The name "coping" originates from 17th-century masonry, referring to beveled blocks designed to shed rain. In modern carpentry, "coping" means cutting one piece of molding to match the profile of an adjacent piece at an inside corner, rather than mitering it — and that joint technique was the saw's original and defining purpose.
Understanding what the coping saw is not helps clarify where it fits in a workshop:
- Not a fretsaw, which has a deeper frame and finer blades for tighter curves in thinner materials
- Not a hacksaw, which lacks the frame depth for turning cuts mid-piece
- Not a jigsaw replacement — it trades power for portability and precise hand control
Anatomy of a Coping Saw
The key components include:
- Throat: The open gap between blade and frame spine (typically 4–6 inches) that sets the maximum cutting distance from an edge
- Tension thumbscrews: Tighten or release blade tension at each end for fast blade swaps
- Swiveling blade holders: Rotate independently so the blade angle can be adjusted without repositioning the frame
- Handle: Wooden or plastic grip that you twist to change blade orientation mid-cut
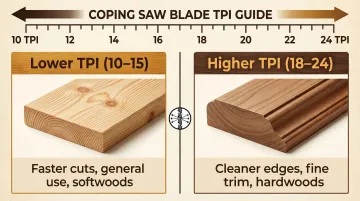
Blade TPI (teeth per inch) ranges from 10 to 20+ depending on the material. Lower TPI (10–15) cuts faster through softwoods; higher TPI (18–20+) produces cleaner edges on hardwoods and fine trim work. Blades are inexpensive and easy to swap, so matching TPI to the job is a simple habit worth building.
What Is a Coping Saw Used For in Woodworking?
Cutting Coped Joints in Molding and Trim
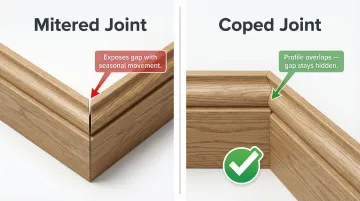
The coping joint application defines the tool. When two pieces of baseboard or crown molding meet at an inside corner, professional trim carpenters prefer coped joints over mitered joints because they better conceal gaps caused by seasonal wood movement and out-of-square walls. The Architectural Woodwork Institute (AWI) mandates coped joints for Premium and Custom grade installations.
Why coped joints outperform miters:
- Wood shrinks in width but not in length—coped joints stay tight as material expands and contracts
- Out-of-square corners (common in older homes) don't affect coped joint fit
- Visual gap is hidden behind the overlapping profile rather than exposed at a corner
The coping saw shapes the negative profile of one molding piece so its front edge nests perfectly against the adjoining piece, creating an inside corner that remains tight through seasonal changes.
Decorative Cutouts and Interior Piercing Cuts
Because the blade detaches and threads through a pre-drilled pilot hole, the coping saw makes scroll saw-style cutouts in the middle of panels without starting from an edge. Common applications include:
- Heart shapes in furniture aprons
- Ornamental chair back designs
- Ventilation cutouts in cabinet doors
- Decorative patterns in jewelry boxes
This interior cutting capability makes the coping saw valuable for custom furniture work where power tool access is limited or where precise hand control prevents overcutting.
Curved Profile Cuts
The thin blade and rotatable frame follow curves, scallops, and arching lines that straight-bladed saws cannot navigate. Practical uses include:
- Shaping furniture legs with gradual tapers or cabriole curves
- Cutting decorative brackets for shelving or trim
- Creating curved frame joinery where bandsaw access is impractical
- Trimming curved edges on small components
Notching and Fitting
When joining framing members, fitting shelf supports, or trimming components to irregular surfaces, the coping saw's maneuverability removes small amounts of material precisely where needed. Common notching applications include:
- Removing waste between dovetail pins and tails during hand-cut joinery
- Fitting shelf dadoes to irregular wall surfaces
- Trimming tenon shoulders for a flush fit
Frame Throat Limitation
The throat depth (4–6 inches) limits how far from the edge cuts can be made. For cuts deep in the center of large panels, a frameless wire saw blade is a practical workaround. The Spyral saw blade, for example, cuts in 360° with no frame, allowing it to reach areas where a standard coping saw frame would bind or block the cut entirely.
How to Use a Coping Saw
Setting Up the Saw
Installing the blade:
- Place the frame's front edge on a bench with the handle pointing up
- Attach the blade to the far spigot first
- Compress the frame by pressing down on the handle until you can hook the near end
- Attach the near end and tighten
The blade should ring with a slight ping when plucked, indicating proper tension. Overtightening causes blade snap; undertightening causes wandering cuts.
Tooth orientation affects how the saw behaves — choose based on your stock and the type of cut:
- Teeth pointing away from handle (push stroke): Best for most coping cuts — gives better sightlines on the cut line and presses the prime face against the supporting material, minimizing tearout
- Teeth toward handle (pull stroke): Useful for thin stock, where pulling keeps the blade in tension and prevents buckling
Making the Cut
Once the blade is set up and tensioned, the actual cutting technique is straightforward — but a few habits make the difference between a clean result and a wandering cut:
- Secure the workpiece firmly in a vise or with clamps
- Mark the cut line clearly with a pencil
- Begin with a short anchor stroke at the line to establish the kerf
- Proceed with steady, full-length strokes
- Steer curves by gradually rotating the handle (which rotates the blade) while keeping the stroke moving forward
- Never force the frame — pressure causes blade deflection and broken blades
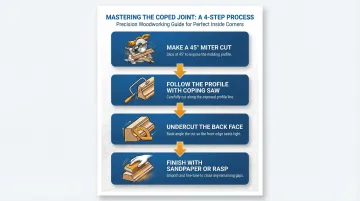
For a coping joint specifically, the process adds a few profile-specific steps:
- Make a 45° miter cut on the molding to expose the profile
- Follow the exposed profile line with the coping saw
- Undercut slightly — angling a few degrees toward the back face — so the front edge seats tightly against the adjoining piece
- Finish with sandpaper or a rasp to close any gaps
Choosing the Right Coping Saw Blade
TPI Selection
Blade selection follows the standard rule: at least three teeth must contact the material at any point during the cut to prevent grabbing.
- Lower TPI (10–15): Best for softwoods and general cuts — removes material quickly with less precision
- Higher TPI (18–24): Better for hardwoods and fine molding work where a smooth, controlled cut matters
Blade Material Types
| Blade Material | Best For |
|---|---|
| High-carbon steel | Wood and wood composites |
| Hardened steel or bimetal | Plastics, PVC, thin aluminum tubing, soft metals |
| Tungsten carbide grit | Ceramics, tile, abrasive materials (uses grit instead of teeth) |
Practical Blade Care
Coping saw blades are inexpensive and designed to be replaced rather than sharpened. When a blade starts to dull, replace it — don't push through. Signs it's time:
- Blade wanders off the cut line despite steady pressure
- Cutting requires noticeably more force than usual
- Frame or blade vibrates or feels like it may snap
Store the saw frame without tension during extended storage to prevent frame fatigue.
Conclusion
The coping saw holds its ground in woodworking precisely because it does things power tools can't. Its portability, multi-directional cutting ability, and blade variety make it the right tool for coped joints, curved profiles, and interior cutouts where a jigsaw or router would be overkill—or simply won't fit.
Understanding throat depth, TPI, and cut direction separates clean professional joints from frustrating tearout. Once you know these variables, the tool stops feeling unpredictable. Whether you're coping crown molding in a historic renovation or cutting decorative curves in a custom furniture piece, each cut becomes intentional rather than accidental.
Frequently Asked Questions
What is a coping saw used for in woodwork?
A coping saw is primarily used to cut coped joints in molding and trim at inside corners, where one piece is shaped to overlap the profile of an adjacent piece. It also handles curved cutouts, interior piercing cuts, and decorative profiles in furniture and cabinetry.
What can I cut with a coping saw?
You can cut wood (softwood and hardwood molding, boards, plywood), plastics and PVC pipe, thin sheet metals, and ceramics—provided you match the correct blade type to each material. High-carbon steel blades work for wood, while bimetal or tungsten carbide blades handle harder materials.
What type of shapes can be cut with a coping saw?
The coping saw excels at curved lines, arches, scallops, notches, and interior cutout shapes like circles, ovals, and decorative motifs. Any shape requiring direction changes during the cut is achievable, within the throat depth limit of 4–6 inches.
What tool is best for cutting curves?
For hand-tool curve cutting, the coping saw is the most versatile and accessible option. A bandsaw or scroll saw offers more power and precision for thicker stock or repetitive production cuts, while a jigsaw covers powered portable cutting.
What is the best tool to cut a notch in wood?
A coping saw is well-suited for small to medium notches in wood, especially where precision and portability matter. A chisel and mallet are preferred for very clean, square-shouldered notches, while a jigsaw or router handles larger or repetitive notching tasks.
What is the difference between a coping saw and a fretsaw?
Both are bow saws for curved cuts, but a fretsaw has a much deeper frame (for cuts far from an edge) and far finer blades (for tighter curves and thinner materials like veneer). The coping saw uses thicker, coarser blades suited to denser stock and is far more common in general woodworking.