Introduction
Many woodworkers and fabricators struggle with frustrating cut quality issues—blades that drift through thick stock, wandering cuts that refuse to follow the fence line, and premature blade breakage that drains budgets. The culprit is often overlooked: improper bandsaw blade tension.
Blade tension ranks among the most critical yet least understood setup factors in bandsaw operation. Too little tension causes blades to bow and wander under feed pressure. Too much, and blades snap without warning while inflicting cumulative damage on wheel shafts and bearings.
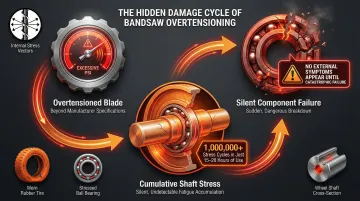
The scale of that damage surprises most operators. According to Highland Woodworking, a bandsaw's revolving shaft accumulates a million compression-tension cycles in just 15 to 20 hours of use — overtensioning accelerates metal fatigue far faster than the machine shows on the outside.
This guide covers:
- What blade tension actually is and why it matters
- How to identify incorrect tension before it ruins your work
- Three practical methods to set tension correctly
- Adjustments by blade size and application
- A routine maintenance schedule to protect your blades and machine
Key Takeaways
- Blade tension (PSI) controls how tightly the blade stretches across the wheels — too little causes drift, too much breaks blades
- Three calibration methods exist: PSI gauge, deflection test, and flutter test
- Use the lowest tension that still produces clean, straight cuts
- De-tension after every session to extend blade life and protect bearings
- Re-check tension whenever you change blades, switch materials, or notice cut quality dropping
What Is Bandsaw Blade Tension and Why It Matters
Bandsaw blade tension is the amount of force per cross-sectional area of the blade, expressed in pounds per square inch (PSI). Because tension measures pressure over area, the force required to reach a specific PSI scales with blade width and thickness. A 1/2" blade needs 312.5 lbs of force to reach 25,000 PSI; a 1" blade requires exactly double — 625 lbs.
How Tension Affects Cutting Performance
Proper tension keeps the blade tracking straight and rigid enough to resist deflection during cutting. Without adequate tension, the blade bends under feed pressure, causing curved or wandering cuts that waste material and frustrate operators. Think of the blade as a spring: insufficient tension lets it flex laterally, while correct tension gives it the beam strength needed for accurate tracking.
Impact on Blade Lifespan
Correct tension reduces metal fatigue by keeping stress within the blade's design tolerance. Both under-tensioning and overtensioning accelerate cracking and shorten replacement cycles. Manufacturers recommend using the lowest tension that delivers clean cut quality — increasing tension beyond what's needed adds stress without improving results.
Silent Machine Damage
Overtensioning puts excessive load on wheel shafts, bearings, and tires. The revolving shaft undergoes continuous compression-tensile cycles that cause metal fatigue failure. A bandsaw shaft accumulates up to a million stress cycles in just 15 to 20 hours of operation under excessive tension — damage builds silently, long before any symptom appears. Poor cuts flag under-tensioning right away. Overtensioning, by contrast, gives no warning until a bearing or shaft fails.
Signs Your Bandsaw Blade Tension Is Wrong
Tension problems show up in cut quality first, then in machine behavior. Catching them early saves blades — and protects the components that are expensive to replace.
Under-Tensioned Blade: What to Look For
Cut quality symptoms:
- Blade bows or barrels through thick stock, especially during resawing
- Cuts curve away from the fence line despite careful setup
- Extreme sensitivity to feed pressure—any variation in how hard you push causes drift
- Wandering cuts that refuse to track straight
Operational symptoms:
- Visible blade flutter between the wheels, even during cutting
- Blade drifts laterally on the wheels rather than riding centered
- Stalling in dense wood or material
Under-tension causes cut quality to fail first. Over-tension goes after the machine itself.
Over-Tensioned Blade: What to Look For
Performance and safety symptoms:
- Premature blade breakage with straight breaks indicating fatigue
- Cracking at the weld joint
- Poor tracking during operation
- Blade snapping without warning—a serious safety hazard
Machine wear symptoms:
- Unusual vibration during operation
- Accelerated tire wear and compression
- In severe cases, bending or fatigue damage to the upper wheel shaft or hinge assembly
Over-tension is the harder problem to catch because wheel shaft stress and tire compression build gradually. By the time vibration or tracking issues appear, internal wear is already underway — check tension before each session, not just when cuts start going wrong.
How to Tension a Bandsaw Blade: 3 Methods Explained
No single universal tensioning method works for every setup. The right approach depends on your equipment, blade type, and required repeatability. Three practical methods provide different accuracy levels and equipment requirements.
The Deflection Method
Process:
- Unplug the saw and back guides completely away from the blade
- Press the side of the blade with moderate finger pressure at an unrestrained section between the wheels
- Correct tension produces approximately 1/4 inch of lateral deflection
- Adjust the tensioning knob until you achieve this benchmark
OEM manufacturers like Grizzly and Rikon officially endorse the 1/4-inch deflection rule as a standard tool-free check.
Limitations:
- The "feel" of correct deflection is subjective and varies by operator
- Harder to replicate precisely across blade changes
- Best used as a quick starting point rather than final calibration
The Flutter Method
This dynamic calibration method is recommended by blade manufacturers because it accounts for actual blade behavior under running conditions rather than static measurements.
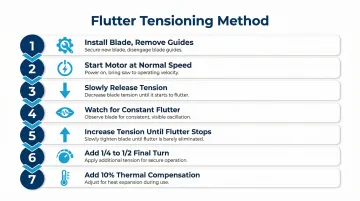
Step-by-step process:
- Install the blade and remove or back off both upper and lower guides
- Start the motor and let the blade run at normal speed
- Slowly release tension while watching the blade between the wheels
- Continue reducing tension until a constant (not intermittent) flutter develops
- Gradually increase tension until the flutter just stops
- Add a final 1/4 to 1/2 turn of the tensioning wheel
- Power down and add approximately 10% additional tension (about 1/8 to 1/4 turn) to account for thermal blade expansion during cutting
Wood Magazine identifies the flutter method as highly accurate because it calibrates tension dynamically to blade width, saw size, and blade type simultaneously—no gauge required.
The PSI Gauge Method
Blade tension gauges (also called strain gauges) directly read tension in PSI by measuring blade deflection under a calibrated load. Brands like Starrett and Lenox manufacture dedicated gauges that clamp directly to the blade.
Recommended PSI ranges for carbon steel cutting blades:
| Blade Material | Recommended PSI Range |
|---|---|
| Carbon Steel | 15,000–25,000 PSI |
| Bi-Metal | 25,000–40,000 PSI |
| Silicon Steel (narrow widths) | 7,000–17,000 PSI |
Forrest Manufacturing confirms that carbon steel blades typically require 15,000 to 25,000 PSI for optimal performance.
Limitations:
- Quality tension gauges are expensive (often $200–$400)
- Not practical for shops that change blades infrequently
Air-Pressure Tensioning Systems:
Industrial bandsaws and portable sawmills use air or hydraulic systems instead of screw-spring mechanisms. Compared to manual tensioning, these systems offer:
- Exact repeatability across blade changes
- Shock absorption that maintains tension during cuts
- Consistent pressure in high-volume or precision applications
For shops running continuous production, air or hydraulic tensioning reduces setup variability and keeps blade performance predictable shift to shift.
Blade Tension by Width, Material, and Application
Wider blades require more physical force—not necessarily higher PSI—to reach the same tension level. Doubling blade width doubles the required force for identical PSI because tension measures pressure over area.
Force scaling example:
- 1/2" blade at 25,000 PSI = 312.5 lbs of force
- 1" blade at 25,000 PSI = 625 lbs of force
Adjusting Tension by Application
Those force differences matter most when matching tension to your specific cut. Here's how application type affects the target:
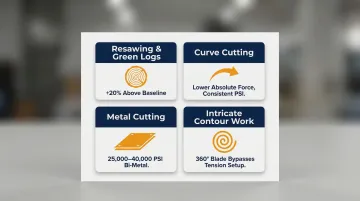
- Resawing and green logs: May require tension up to 20% above baseline. Timber Wolf explicitly recommends this adjustment for heavy-duty cutting through large stock.
- Curve cutting: Narrow blades for tight curves need lower absolute force due to their smaller cross-sectional area, though the PSI target stays consistent.
- Metal cutting: Dense materials require firm, consistent tension to prevent blade wandering. Bi-metal blades designed for metal cutting call for higher tension ranges (25,000–40,000 PSI) due to their stiffer construction.
- Intricate contour work: For tight spirals, notches, and complex contours, round wire saw blades like the Spyral sidestep tension management entirely — their 360-degree tooth configuration cuts in any direction without the setup constraints of flat blades.
Correcting Mid-Session Tension Loss
Once you've dialed in the right tension for your application, thermal expansion during a long session can quietly undo that setting. If cuts start drifting or bowing mid-run, blade heat is likely the cause. Manufacturers recommend increasing tension by approximately 5% as a corrective step when cut quality declines mid-session.
Bandsaw Blade Tension Maintenance: Schedule and Best Practices
Maintenance Frequency Guide
| Maintenance Task | When to Perform |
|---|---|
| Full re-tensioning | Every blade change or reinstallation |
| Tension check | Start of heavy-duty sessions (resawing, green wood, metal) |
| Flutter test calibration | When switching to significantly different blade width |
| De-tensioning | After every use session |
De-Tensioning: Non-Negotiable Habit
Leaving a blade at full tension when the saw is not in use compresses wheel tires, fatigues springs, and can permanently deform the blade. This isn't optional maintenance—it's essential protection for both blades and machines.
What goes wrong when you skip it:
- Compressed rubber tires develop compression set (permanent flattening)
- Springs lose tension over time when held compressed
- Blade steel develops "memory" of the wheel positions, causing gullet cracking
De-tensioning in practice:
- If your saw has a quick-release lever, use it after every session
- If using a screw tensioner, back off a consistent number of turns after each session and reverse before the next
Getting this habit in place protects your investment at both ends: blades last longer between replacements, and machines hold their calibration longer between tune-ups. The goal at every session is the same — the right tension for the cut, not the most tension the saw can handle.
Frequently Asked Questions
How do I know if my bandsaw blade tension is correct?
Correct tension produces approximately 1/4 inch of lateral deflection when you press the blade with moderate finger pressure. Using the flutter method, the blade should run without visible wobble between the wheels. During cutting, properly tensioned blades track straight and cut without drifting under consistent feed pressure.
What happens if bandsaw blade tension is too tight?
Overtensioning causes premature blade breakage, poor tracking, accelerated wheel tire wear, and potential metal fatigue damage to the wheel shaft or upper hinge assembly. This makes overtensioning the more dangerous mistake: damage builds gradually and goes unnoticed until a component fails.
Should I release bandsaw blade tension when not in use?
Yes, always de-tension after each use. Leaving a blade under full tension compresses the rubber tires permanently, strains the springs, and can deform the blade itself. Back off the tensioning knob a consistent number of turns after each session, or use a quick-release lever if your saw has one.
What is the flutter method for tensioning a bandsaw blade?
Run the saw, slowly release tension until the blade develops a steady flutter between the wheels, then increase tension until the flutter just stops. Add a final 1/4 to 1/2 turn for thermal expansion. It's the most reliable non-gauge tensioning method for both wood and metal cutting blades.
Can I use a bandsaw to cut metal?
Yes, bandsaws can cut metal with the right blade—bi-metal or carbide-tipped—and correct speed settings (slower than wood cutting). Proper blade tension matters more for metal cutting: a rigid blade prevents wandering through dense stock.
What TPI is best for cutting metal?
Higher TPI (typically 14–24 TPI) works best for thin metals to keep multiple teeth in contact with the workpiece at all times. Thicker metal stock may use 6–10 TPI. Always match TPI to material thickness rather than using a one-size-fits-all blade—the rule is maintaining at least 3 teeth in contact with the material during cutting.