Introduction
The coping saw remains one of the most accessible and underrated tools for cutting curves—compact, affordable, and built to navigate tight radii, inside profiles, and complex shapes without a bandsaw or jigsaw. While the tool appears simple—just a C-frame with a thin blade—results vary dramatically based on setup and technique.
Poor cuts almost always stem from setup issues, not tool limitations:
- Insufficient blade tension causes wandering
- Wrong TPI selection leaves rough edges
- Improper stroke technique breaks blades mid-cut
This guide covers setup, step-by-step cutting technique, the variables that most affect cut quality, and the most common mistakes to avoid.
Key Takeaways
- A coping saw cuts curves using a thin, tensioned blade in a C-frame, excelling at outside curves, inside profiles, and tight radii power tools can't easily reach
- Blade TPI, frame tension, and stroke direction (push or pull) are the three biggest factors in cut accuracy
- Mark your layout clearly, stay outside the line, and refine the curve with a chisel or rasp after sawing
- Specialized wire saw blades with 360° cutting capability handle confined spaces, odd angles, and non-wood materials
What You Need Before Cutting Curves With a Coping Saw
Preparation directly determines how clean and accurate your cut will be. Improvising the setup mid-cut almost always leads to a wandering blade or a broken one. Professional woodworkers with high-tension frames experience minimal deflection (≤0.20"), while budget frames with poor tension show >0.28" deflection and difficult, wandering cuts.
Equipment and Workspace Setup
Minimum equipment required:
- Coping saw with functioning tension mechanism — Budget saws rely on frame spring and handle twist; professional frames use rigid aluminum/steel construction with cam-levers or dual-end screws
- Workbench or clamp setup — The workpiece must not move during the cut; use a vise, clamp to bench, or specialized jig
- Marking tool — Pencil or marking knife to clearly define the cut line on both faces of the board
A bird's mouth jig (V-board) significantly improves control for small or intricate pieces. This simple device is a board with a deep V-shaped notch cut into one end, clamped to the benchtop with the notch overhanging the edge.
It supports both sides of the workpiece right up to the cut line. Hold the piece over the notch with one hand, saw vertically with the other, and rotate the piece to follow the curve.
Choosing the Right Blade
TPI Selection:
Lower TPI (10–15) delivers faster, rougher cuts in thick stock. Higher TPI (18–24) produces fine, controlled curves requiring minimal cleanup. Thicker stock requires lower TPI to clear sawdust efficiently.
| TPI | Kerf | Best For |
|---|---|---|
| 10 TPI | 0.033" | Aggressive cuts in thicker stock |
| 15 TPI | 0.028" | Medium/general purpose |
| 18 TPI (Skip) | 0.026" | Tighter-radius cuts, thin stock, dovetail waste |
| 20–24 TPI | 0.018"–0.020" | Extra fine teeth for smooth finish |

A worn or cheap blade will flex and drift off the line regardless of TPI. Check blade straightness before starting and replace anything dull. The "three-tooth engagement" rule requires at least three teeth engaged in the material at all times — fewer causes snagging or blade breakage.
How to Cut Curves With a Coping Saw: Step by Step
Follow these steps in order. Each one sets up the next, and most cut quality problems trace back to setup errors in the first two steps.
Step 1: Mark the Layout and Secure the Workpiece
Layout:
- Draw or trace the curve clearly on the face of the workpiece
- For critical cuts, mark both faces so you can monitor the cut from either side
- Stay at least 1–2mm outside the finished line to leave material for refinement
Clamping: The workpiece must not move during the cut. Use a vise, clamp to bench, or position over a bird's mouth jig for small pieces. The V-board is particularly effective for intricate work, providing stable support while allowing rotation.
Step 2: Install and Tension the Blade Correctly
Installation: Pins hook into the frame sockets. The handle is twisted to add tension. Standard frames tension the blade by capturing the blade pins in rotating sockets and pulling the frame arms together via a threaded handle twist or end screw.
Tension test: Pluck the blade like a guitar string. A short, high-pitched note indicates correct tension. A loose, flabby twang means re-tensioning is needed. Insufficient tension is the single most common cause of blade deflection and wandering cuts.
Blade orientation: Teeth can face toward the handle (cutting on the pull stroke) or away (push stroke). Authoritative sources recommend the pull stroke as the default—it keeps the blade under tension during the cut and is easier to control. On the pull stroke, the blade stays taut rather than buckling under compression—which matters most on thin blades cutting tight curves.
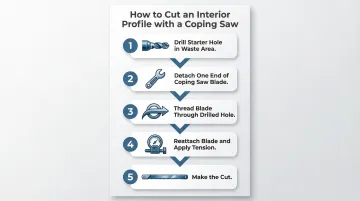
Step 3: For Inside Curves, Drill an Access Hole First
Cutting an interior profile (a curve that doesn't start from an edge) requires drilling a starter hole inside the waste area. The standard procedure:
- Drill a small starter hole at the starting point of the design
- Detach one end of the coping saw blade
- Thread the blade through the drilled hole
- Reattach the blade to the frame and apply tension
- Make the cut
The blade may need to be rotated relative to the frame so the frame doesn't interfere with the workpiece as the cut progresses. Most coping saws allow 360° blade rotation within the frame.
Step 4: Make the Cut — Body Position and Stroke Technique
Correct posture: Only the arm should move, in a straight pendulum-like motion. Let the saw do the work—do not force the blade through the material or apply side pressure, as this causes deflection.
Stroke mechanics:
- Use the full length of the blade on every stroke
- Short choppy strokes clog the teeth with sawdust and slow the cut
- To navigate a curve, turn the blade on the cutting stroke only
- Never try to redirect on the non-cutting stroke—this is one of the most common causes of blade breakage
Sharper curves require faster strokes — more strokes per minute — to maintain control while turning the blade. If cutting speed and turning speed aren't matched, the blade binds or overshoots the line. Smooth, sweeping curves allow slower, longer strokes; tight radii need a quick, controlled rhythm with gradual steering.
Step 5: Refine and Clean Up the Curve
Once the saw cut is complete, pare down to the line using a sharp chisel in light, controlled slices.
Chisel technique by curve type:
| Curve Type | Chisel Orientation | Why |
|---|---|---|
| Concave (Inside) | Bevel Down | Resists digging in; lets the chisel swing smoothly into the curve |
| Convex (Outside) | Bevel Up | Keeps the edge skimming the surface rather than digging in |
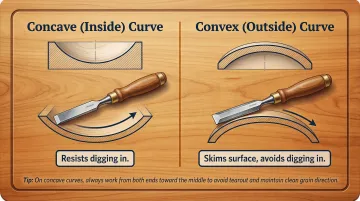
Work from both ends toward the middle on concave curves to avoid tearing across the grain.
Final smoothing: Use a rasp, file, or sandpaper wrapped around a dowel or shaped block to blend facets into a fair, continuous curve. For precise work where rasps are too coarse, wrap a 1/4" or 3/8" wooden dowel in fine sandpaper (#220-grit) to act as a custom rattail file for inside curves.
Key Parameters That Affect Your Curve Cuts
The difference between a controlled, clean curve and a wandering, ragged one almost always comes down to managing a few specific variables.
Blade Tension
Insufficient tension is the single most common cause of blade deflection, wandering cuts, and difficulty controlling direction. A loose blade will flex sideways in the kerf and is nearly impossible to steer accurately.
- Budget frames: Rely solely on frame spring and handle twist; frames often lose shape and bend inward over time, failing to hold tension (deflection >0.28")
- Professional frames: Use rigid aluminum/steel frames, cam-levers, or dual-end screws (deflection 0.137" to 0.189")
Most budget coping saws cannot achieve high enough tension to cut reliably. Check tension before every cutting session and re-tension after storage or a fresh blade install.
Budget saws can be temporarily improved by adding 5/16" split washers to the locking mechanism to prevent the blade from twisting.
TPI (Teeth Per Inch)
TPI controls both cut speed and surface finish. Lower TPI removes material faster but leaves a rougher edge; higher TPI is slower but produces a finer edge requiring less cleanup.
As a general rule: use 10–15 TPI for thick, soft wood and 18–24 TPI for hardwood or thin stock where a finer finish matters.
The "three-tooth engagement" rule ensures at least three teeth contact the material thickness at all times, preventing blade snagging.
Blade Angle Relative to the Frame
Most coping saws allow the blade to rotate within the frame. Angling the blade relative to the frame allows the saw to reach into areas where the frame would otherwise collide with the workpiece edge.
When to use a rotated blade:
- Deep cuts far from the workpiece edge
- Interior profiles
- Wide boards where the throat depth would be limiting
Standard coping saw throat depths range from 4-3/4" to 6-1/2", with blade lengths 6-1/2".
Stroke Speed and Curve Radius
Sharper curves require faster strokes to maintain control while turning the blade. If the cutting speed and turning speed aren't matched, the blade binds or overshoots the line. Smooth, sweeping curves reward slower, longer strokes. Tight radii require a quicker sawing rhythm combined with gradual, deliberate steering.
Common Mistakes When Cutting Curves With a Coping Saw
Avoid these four errors and you'll waste fewer blades and get cleaner results:
- Stay 1–2mm proud of the line — cutting right to it leaves no room for tearout or slight overcutting; refinement comes later
- Don't force the stroke — if the blade isn't moving freely, the fix is checking blade tension or clearing sawdust, not applying more pressure
- Only change direction on the cutting stroke — turning during the return stroke is the leading cause of blade breakage
- Plan for a cleanup pass — cut proud of the line, then refine with a chisel or rasp; this is standard practice, not a workaround
Alternatives to a Coping Saw for Cutting Curves
A coping saw is highly capable but has real limitations—throat depth, blade length, and material compatibility all create situations where another tool performs better.
Fret Saw or Scroll Saw
For extremely fine fretwork, marquetry, or tight decorative patterns, a fret saw outperforms a coping saw. Fret saws accept thinner scroll saw blades (0.005" to 0.011" thickness) for greater detail, with throat depths ranging from 2-3/4" up to 8".
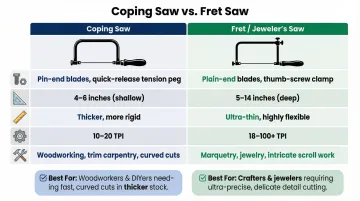
| Feature | Coping Saw | Fret / Jeweler's Saw |
|---|---|---|
| Blade Attachment | Pin-end (fits into rotating sockets) | Pinless/Plain-end (clamped to frame) |
| Throat Depth | 4-3/4" to 6-1/2" | 2-3/4" up to 8" |
| Blade Thickness | 0.018" - 0.020" | 0.005" to 0.011" |
| TPI / Gauge | 10 to 24 TPI | Sized by gauge (2/0, 3/0) up to 92 TPI |
| Primary Use | Furniture curves, dovetail waste | Marquetry, fine fretwork, precious metals |
That said, fret saw blades break more frequently and can't handle the aggressive joinery or furniture work a coping saw manages without complaint.
Bandsaw or Jigsaw
For larger workpieces, thicker stock, or production work where speed matters, power tools take over. The bandsaw is the ideal power tool for curves due to its smooth cutting action, flat table support, and ability to produce square edges. Both tools handle long, sweeping curves efficiently and eliminate the physical effort of hand sawing.
Minimum radius capabilities:
| Bandsaw Blade Width | Minimum Circle Diameter | Minimum Radius |
|---|---|---|
| 1/8" | 3/16" | 3/32" |
| 3/16" | 3/8" | 3/16" |
| 1/4" | 3/4" | 3/8" |
| 3/8" | 1-3/4" | 7/8" |
The trade-off: power tools require the work to come to the machine, lack the access advantage of a hand-held coping saw, and are less suited for interior profiles or very tight radii.
Spiral Wire Saw Blade
Some cuts simply can't be made with a flat blade. The solution is a blade that features a cutting tooth 360 degrees around the blade. Conventional spiral coping saw blades are thin flat blades that have been twisted. They are not very popular because they are prone to breakage and leave a wide kerf.
The Spyral blade by Bestway Products (spyralsaw.com) is built from a round wire (not twisted) with a continuous 360-degree cutting tooth formed from hardened steel wire. Key chracteristics:
- Cuts from any angle, position, or direction without having to reposition the blade. This enables the cutting of work pieces that would otherwise interfere with the frame.
- Suited for sculptural internal shaping where flat blades can't reach
- Cuts sharp angles and notches
- Cuts light metals (aluminum, brass, copper) as well as wood, bone, and foams
Material compatibility: Spiral blades are recommended for wood, plaster, wallboard, plastics, wax, bone, horn, and other materials that conventional coping saw blades may struggle with.
Wire saw blades aren't a drop-in replacement for standard coping saw blades — they require specific mounting systems rather than a standard coping saw frame. Think of them as a specialized option when the geometry of the cut or the material type exceeds what a traditional toothed blade can do.
Frequently Asked Questions
What is the best saw for cutting curves?
For hand-tool work, a coping saw handles most curved cuts well in furniture making and joinery; a fret saw is preferred for delicate marquetry and fretwork. For power tools, a bandsaw excels at larger curves while a scroll saw handles intricate detail work. The best choice depends on curve radius, material, and acceptable refinement work.
Is a coping saw good for cutting curves?
Yes, coping saws are well-suited for curved cuts—their thin, tensioned blade navigates tight radii and inside profiles that larger saws cannot reach. Results depend heavily on proper blade tension and technique. The cut is typically refined with a chisel or rasp afterward, as the coping saw is a roughing tool, not a finishing tool.
What TPI blade should I use for cutting curves with a coping saw?
Use 10–15 TPI for faster cuts in thicker or softer stock, and 18–24 TPI for finer cuts in hardwood or thin stock requiring a smooth finish. Higher TPI leaves less cleanup work but cuts more slowly. Match TPI to your material thickness using the three-tooth engagement rule.
How do I cut inside curves (interior profiles) with a coping saw?
Drill a starter hole in the waste area first, then thread the detached blade through it and reattach it to the frame under proper tension. The blade may need to be angled relative to the frame so the frame clears the workpiece edge during the cut.
Why does my coping saw blade keep breaking?
Most breaks result from steering on the return stroke, applying excessive lateral pressure, or running a poorly tensioned blade that binds in the kerf. Turn the blade only on the active cutting stroke, and verify tension before starting—a correctly tensioned blade produces a short, high-pitched note when plucked.
What is the difference between a coping saw and a fret saw for cutting curves?
Coping saws have pin-end blades, a shallower throat (4-3/4" to 6-1/2"), and suit general carpentry curves and joinery. Fret saws offer a deeper throat (up to 8"), accept very thin pinless blades (0.005"–0.011"), and excel at fine decorative work like marquetry and fretwork.